You’ve spent hours perfecting a design. The metallic gold accent is brilliant. The fluorescent pink pops exactly how you imagined. You export the file, send it to print and wait.
What comes back looks flat. Dull. Nothing like what you designed. Here’s the problem — if your spot colors aren’t set up correctly in Adobe Illustrator, they won’t output as distinct separations the way production requires. Instead, they’ll convert to standard process color during output, and you’ll lose the vibrancy, precision and visual punch that specialty colors are meant to deliver.
When you set up spot colors properly in Illustrator, you get accurate, consistent color reproduction. Brand colors match across every material. Metallics print metallic. Fluorescents print vibrant. Your designs deliver exactly what you promised.
This guide walks through the complete setup process, from defining spot colors in Illustrator and applying them correctly to verifying the separations before your file goes to press.
Spot colors are premixed inks that print as a separate layer on the press. Unlike CMYK process printing that builds colors by layering cyan, magenta, yellow and black together, spot colors use a single ink formulated to match a specific color value.
The Pantone Matching System is the industry standard for spot color specifications. It includes thousands of premixed colors, each assigned a unique numerical identifier. When you specify a Pantone color, your printer mixes or purchases that exact ink formula. The result is consistent, accurate color reproduction every time you print.
Spot colors are essential when you need precision and impact that CMYK can’t deliver. They’re ideal for brand identity and packaging, where corporate colors must match exactly across different materials. They’re also the only way to reproduce metallics or fluorescents that fall outside the CMYK color range.
Once you understand what spot colors are and when to use them, the next step is to set them up correctly in your design file. Adobe Illustrator is the industry-standard tool for vector design work, giving you the precise control you need to define spot colors, apply them accurately and verify they’ll separate correctly on the press.
Here’s how to define, apply and verify spot colors so your files print correctly.
Access the swatches panel by selecting Window > Swatches. This panel is your color control center, where you’ll manage all spot colors for your project.
Click the swatches panel menu icon in the top-right corner. Select Open Swatch Library > Color Books. You’ll see multiple Pantone libraries, including solid coated, solid uncoated, metallic coated and others.
Choose the library that matches your printing substrate. Coated papers produce different results than uncoated stock, so selecting the correct library ensures accurate color delivery that matches your expectations.
Find your specific Pantone color and click it to add it to your swatches panel. The color appears with a small dot icon in the corner, indicating it’s defined as a spot color rather than a process color.
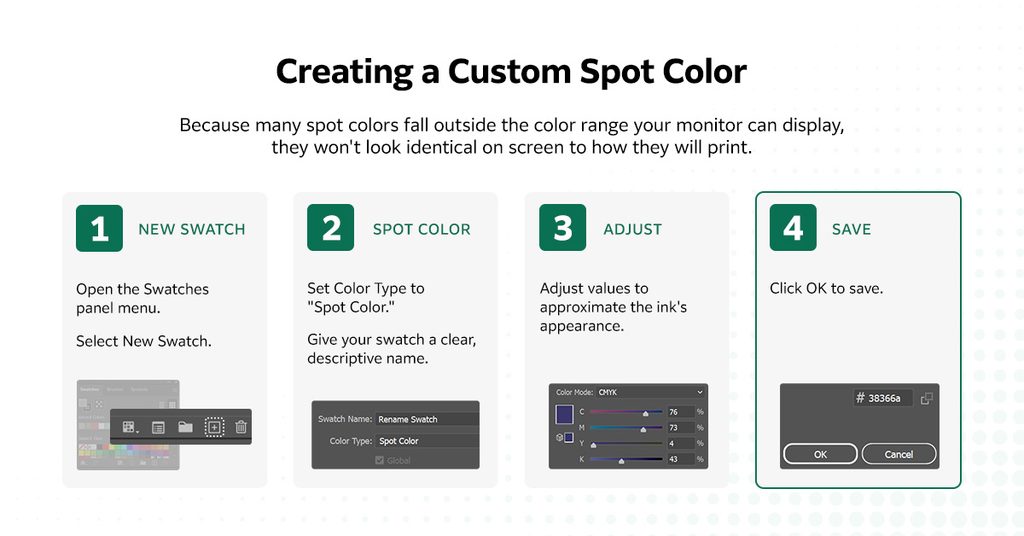
Sometimes you need a custom spot color that isn’t included in standard Pantone libraries. It may be a proprietary brand color or a special ink your printer has formulated.
Open the Swatches panel menu and select New Swatch. In the dialog box, set Color Type to “Spot Color.” Give your swatch a clear, descriptive name that you and your printer will recognize, taking care to observe any required naming conventions.
Adjust the color values to approximate the ink’s appearance on screen, then click OK to save. Because many spot colors fall outside the color range your monitor can display, they won’t look identical on screen to how they will print.
Select the object, text or path you want to color. Click the spot color in the Swatches panel to apply it. Check the color panel to confirm the spot color name appears there, and verify it’s applied as a spot color rather than a process color build.
Go to Window > Separations Preview to open the panel. For best results, also enable View > Overprint Preview to see how colors will interact when printed. The separations preview panel shows which inks will be used when your file prints, letting you catch setup errors before it goes to press.
You’ll see a list of every ink separation in your document, including process colors and spot colors. Toggle each separation on and off individually. Your spot colors should appear as distinct separations, not combined into the CMYK layers. If a spot color you intended to use appears only in CMYK separations, it’s defined incorrectly and needs to be corrected.
Convert all text to outlines by selecting Type > Create Outlines. This prevents font substitution issues. Embed or properly link all placed images. Add bleed — typically 1/8 inch or 3 millimeters — to extend the colors beyond the trim edges.
Export your file as a print-ready PDF. PDF/X-4 is a reliable format that preserves spot color information. Before the file goes to press, confirm that the printing equipment is set up for spot colors and can handle the specific Pantone inks you’re using. If your design includes metallics or fluorescents, verify the press or printer supports those specialty colors, whether through specialty inks or toner-based embellishment layers.
Your design setup is complete. The colors are exactly right. The composition is sharp. A few small oversights during file prep can undo that work before it ever reaches paper. Catching them during setup helps achieve the precision and impact you intended during design.
Mastering spot color Illustrator techniques is only half the battle. Bringing those bold colors to life is the real goal. The Fujifilm Aspire Program provides designers and print operators with training, samples and tools that help impress clients and win high-value specialty color work. This free resource suite is built specifically for creative professionals working with spot colors, metallics, fluorescents and CMYK+ embellishments on supported Revoria presses.
Aspire offers high-impact resources to help take your print business to the next level. Hands-on training modules build expertise quickly in complex color management for specialty ink or toner. Physical print samples demonstrate specialty color capabilities to clients and help you land more profitable projects more confidently.
Protecting your bottom line is just as important as achieving your creative vision. Profit estimation tools simplify pricing for complex projects, helping you to protect your margins while staying competitive. When you back your design work with Aspire’s extensive resources, specialty color work becomes a powerful competitive advantage for your business.
Your print quality and profit margins are too valuable to risk. The Fujifilm Aspire Program gives you the training, physical samples and pricing tools you need to help turn complex specialty color designs into physical realities. Contact Fujifilm today with questions or to request additional information.


